
Until I can figure out a way to bring photos over from shutterfly, feel free to check out the photos of the beginning stage. There are a few regular photos of my kids, just as a reminder that I just had my daughter...and we were building a garage at the same time. Needless to say, it was a busy time!
http://janaelehtofineart.shutterfly.com
Click here to view these pictures larger
I took most of this from older posts, so most of the interior shots may look familiar...and there will be back and forth text, some from the original posts and some current.
This is my studio, finished on the outside...(back in 2008...it's changed since then).
My husband has been working hard lately...as soon as he gets home from his labor intensive job, he goes and works on my studio! It's looking really nice - and I'm getting excited! Here are the most recent photos:
(UPDATE: The sheetrock panels were HEAVY! I have no idea how he was able to do it because it was hard enough for the two of us to put them up...and no, he didn't build any tools to help.)

Lots of insulation...notice the vent on the ceiling? It will be connected to a timer later...

The studio has its own circuit breaker.


I decided to try out the studio and completed "Bovine Curiosity" here.

Do you see the sheetrock notched out there? That's for my easel when I do large paintings...It could happen.

I'll post better pictures once the sheetrock is complete and we've had a chance to clear things out of the way.

We've been working hard at the studio (hahaha...did I just say "we"? OK - my husband has been working hard!)
I've lost count on the number of coats/sanding/recoats of sheetrock mud to the walls and ceiling, but it's almost there! The dust from sanding the mud has permeated every nook and cranny of the building. The ceiling still has to be finished, but the trim for the windows went up today. At first I wanted deep windows (oh, I forgot what they're called), but after reading about the different window trims and recommendations, I decided to go with the standard trim since it was a small room. 
Painting just may happen this week - You'll be soooo surprised!
White...The walls, ceiling and trim...white. I know, I could have picked all different colors, bold, soft, blue, red, but I chose white.
I've read that a mid-tone gray is the best for a studio, but I love to have things bright, and since my windows are not that large (for more wall space), I want it bright!
The corner here is for my future office, hence the recessed light and lots of outlets (there are more closer to the floor). Need I say more? There are a few more things that need to be done...and then I'll be able to organize, clean, dust, etc.

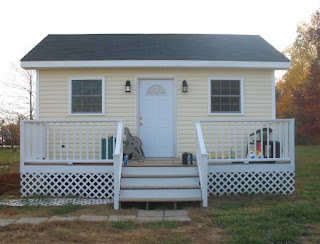
Just a picture of the outside - the door will change Monday, exchanging it for a glass door to get more northern light into the studio. Landscaping still needs to be done and as you can tell, this was taken the night before trash day!
 ---
---This is what you see as you open the door. Track lighting for paintings. Cabinets to the left...bookshelves to the right.

---
As you walk in, look left and you see my desk - for my day job. And yes, that's a panel all for my studio. I'm not sure if you can tell, but there are 3 recessed lights above the desk, 2 double switches above the desk and 2 quad switches below the desk. (Did you notice the light switches? There's a quad switch for the lights (1. fluorescents in center of room; 2. fluorescents above the cabinets and shelving; 3. track lighting; 4. outside lights) and then a separate single switch for the recessed lights. This was originally supposed to be a dimmer, and may change to it later.
 ---
---Cabinets - just simple ones ready made from Lowes. There's a timer for the vent above (gotta have that for all sorts of art mediums) and a couple double outlets there. Another light switch behind the books for the fluorescents below the wall cabinets. The table is an antique that we need to get rid of in place of a sturdy drafting type table. I need the space for matting and framing.
 ---
---This is what you see as you look right from the front door. This is the messy area - still working on these finds...something I found on craigslist. I'm painting them white and will have to do something about those cut outs. Notice the fluorescent lights above these units. (Haha, disregard the deflated excercise ball. Not much can be done with 2 small kids. They love it as a toy).
 ---
---The other 2 units - can you tell which one I've primed already? Just in case you guys ever need to vaccuum sheetrock dust - make sure you don't use the light weight shop vacs! Apparently, sheetrock dust is very heavy and will clog the lighter shop vacs in no time. I had to go out and buy the bigger one. Oh - the cut out in the ceiling is the attic access. There are 2 lights up there.
 ---
---So, that's it for now. My kids painted tonight in the studio - it's a good thing the floor isn't real wood. (And let me tell you that even though you may know they're painting, and there's all colors including red, it's still pretty freaky when you see red paint splatter all over the floor...I couldn't help looking for boo-boos).

I took a few pictures of my studio today since we've added a few things lately.
Living in North Carolina requires air conditioning, so my husband added a window unit. No need to add central air in my little studio! The grass looks brown because we had someone come by and weed-eat, so I need to rake the dead grass away.
I'll also work on the landscaping once the weather cools down. My husband and I are trying to plan out a large patio and pergola between our house and studio, so that's why nothing has been done here...
Oh - and shutters...I need to get shutters...and complete the lattice around the porch.

I've already posted my cabinets, but I thought I'd add them here since it's now "lived in". The sides of the counter top need to be finished and I need to add the hardware.

Notice the flat file? I love this thing...and have been looking for a "cheap" one for about a year. I'm so excited about it! Now I can put my watercolor papers, my class charcoal portraits, mat board, etc in it. Yay!!! (Now I'll just have to figure out where it will go. Maybe I'll have my husband build me a cabinet for it).
(Trim still needs to be added on the bottom). I'm not posting any pictures of the other side...that's too lived in and I still need to organize!
---
So, that's it for now. I will try to post some updated photos of it. I have a lot more furniture in there and it's in that "clean your studio" phase.
---
So, that's it for now. I will try to post some updated photos of it. I have a lot more furniture in there and it's in that "clean your studio" phase.
1 comment:
WAOU ! I love your video showing the birth of the studio ! You have a GREAT HUSBAND ! Enjoy your studio :)
Anne
Post a Comment